Fast.AI Course V4 with Google Colab and VS Code
The latest version of the popular Fast.AI course is now underway and has moved online, due to the restritions in-lieu Corona Pandemic. Though the videos will be available to general public on July, you can still access the notebooks of the latest version here.
https://github.com/fastai/course-v4
The course will be largely based out of the book, which is scheduled to release on July 2020 as well.
Though Google Colab gives you a notebook “like” interface, it would be difficult in using this as a development environment. In this post we will see on how we can use the underling hardware of Google Colab to setup a VS Code based GPU/TPU environment.
To do this we will use the two services listed below.
- Coder, which provides us with the option to run VS Code, accessible via browser through Code-server.
- Ngrok, which provides public and secure access by enabling URLs to your local application.
Mount Google Drive
Mount your Google drive with the command below, you’ll be asked to enter an authorization code that will be provided as output of the cell below.
from google.colab import drive
drive.mount('/content/gdrive/')
Clone fastbook
Now clone the latest version of ‘fastbook’ from the github repository, into the Google Drive.
!git clone https://github.com/fastai/course-v4 'drive/My Drive/course-v4'
Download and unzip the required packages
We will need latest release of code-server and ngrok, to enable the setup. Let us download and decompress the files.
!curl -sSL https://github.com/cdr/code-server/releases/download/2.1698/code-server2.1698-vsc1.41.1-linux-x86_64.tar.gz| tar -xvz
!wget https://bin.equinox.io/c/4VmDzA7iaHb/ngrok-stable-linux-amd64.zip
!unzip ngrok-stable-linux-amd64.zip
Generate Authtoken
Create a free account in Ngrok, this will be used forward the port where code-server runs. This step needs to be done to avoid too many connections error (greater than 20 connections within 60 seconds, which is a limitation for un-registered accounts)
print("Get your authtoken from https://dashboard.ngrok.com/auth")
import getpass
authtoken = getpass.getpass()
Create tunnel
!./ngrok authtoken $authtoken & ./ngrok http 8443 --log=stdout & ./code-server2.1698-vsc1.41.1-linux-x86_64/code-server --port '8443' --auth 'none'
Output from the cell will have a link, ending with the format http://<random_value>.ngrok.io

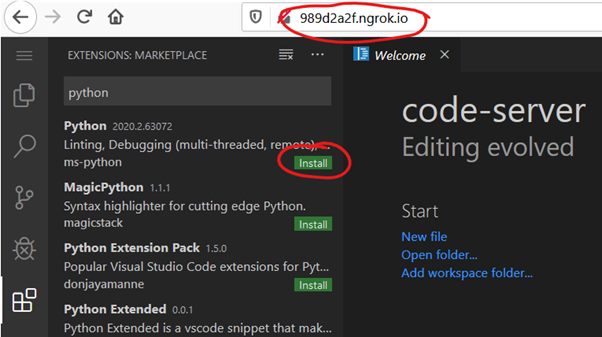
Access the URL to get a VS Code interface. Now let us enable ipython notebook support by installing the Microsoft Python Extension.
Go to ‘Extensions’ option in the VS Code, and search for ‘Python’ and click on ‘Install’.
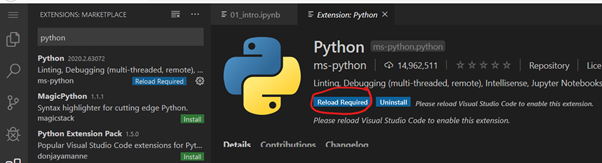
Once done, reload the VS Code UI by clicking on ‘Reload Required’. This will enable the installed plugin.
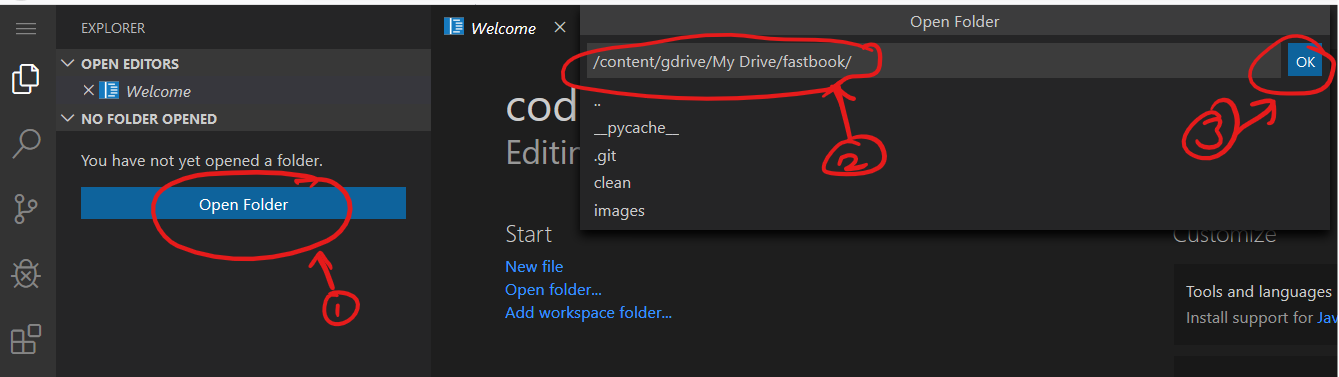
To set the working directory, click on the ‘Explorer’ button, on the text box, type the directory where ‘fasbook’ was cloned initially.
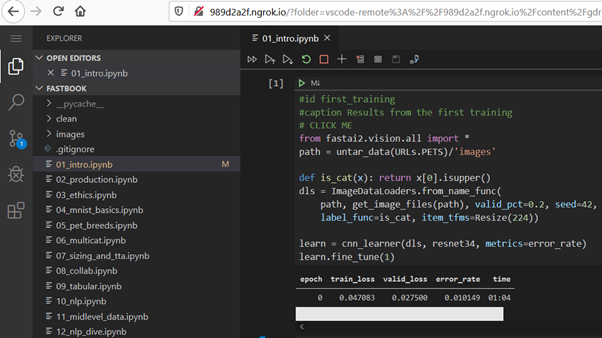
This will list all the notebooks on the left, select the notebook you want to work with and proceed as usual.
You can also clone the notebook from here into your account to see this live in action.
Note:
Prior to starting any new notebook, ensure you execute the command below, to avoid import errors..
!pip install -r requirements.txt